Back in the Swing of Projects
Well I bet you all thought I disappeared. Truth is, I have been traveling extensively between Europe and Alaska and haven't made much progress in the summer season. This is unfortunate because our warm season in Minnesota is so short, but I must work so let it be. After a long season I have returned back home to settle in for a long winter and ready to be productive. My first few weeks at home I did all the little outdoor projects to get ready for our bitter cold winter. The yard needed to be cleared and the flower beds raked out. I had to do some touch up painting, cleaning some windows and enjoy a little bit of the last few days of summer. Now the weather is getting cooler and it is time to start working inside. I have decided to work on the stairway and see what I can do to finish up the upper landing and work on refinishing the stairway. I haven't done much work on this area since I got it functionally put together. Here is the post I wrote about that project: Restoring the Open Stairway
I have been searching for years (yes YEARS) to find a chandelier that I would not only like for above the open stairway, but also something that gave a grand impression and was scaled to fit a 2 story open stairway. One day I cam across something I though would work. The seller was asking more than I wanted to spend so I made a ridiculously small offer on it and he accepted. It was an interesting chandelier I was told was made by the Thomas Day and Company based out of San Francisco in 1893. The seller informed me that it had come out of an old mansion in San Francisco and that he had had in in storage for nearly 35 years. From the photos the seller was providing I liked the look and thought it was interesting. It appeared brass to me and was a gas and electric fixture. I was apprehensive about having it with electric sockets because all the other light fixtures I have bought for the house were strictly originally gas. Looking at the photos and the arms of the electric they matched so if it was not original to the fixture, it was a very early addition. I still think it might be original but someone might be able to tell me otherwise. I did contact the company that purchased the Day company, but they sadly did not have a catalogue from the year of the chandelier and limited catalogues from other years. Looking at what they did have, the chandelier was similar to what the company was making at the time.
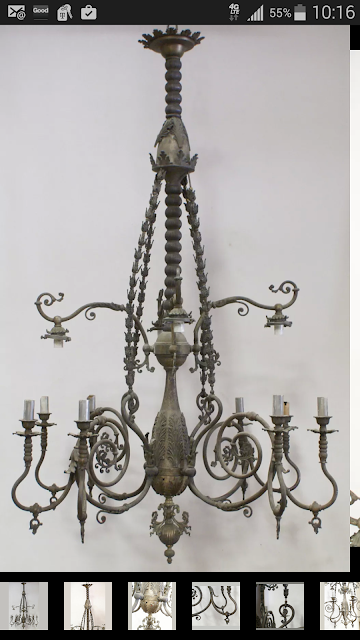


As you can see this chandelier has potential, but it had seen better days. When I got it home I took it into the lighting store to discuss getting the brass cleaned up a little and getting it wired. I knew that I wouldn't be able to get the brass all polished up because it would cost a fortune. I figured they would clean it up and bit and wire it and I would hang this beauty up. When I was speaking to the store owner they informed me the chandelier was actually silver. Yes silver plate! It was impossible to tell but there were a few spots that had showed a little silver color. The shop recommended to get it replated or see what it would cost to get cleaned. It would cost at least $1,000 they estimated but said it would be worth it as it was a good and unusual chandelier. Going home with my box of pieces of a great light fixture I was sold on the idea of getting the chandelier all polished up but $1000+ seemed a bit pricy. So I decided I would roll up my sleeves and spend eternity polishing the chandelier myself and see what I could accomplish. I decided on a 4 step process. Twice I would use the hot water and baking soda method, third I would use actual silver polish and the last step would be to see what I could do about keeping the tarnish away, whether it was lacquer or waxing.
The first step would be to get all the black grime off. I couldn't just use traditional polish and take it off. The finish was gritty and black and was really on there so I used a method I have used quite a bit in the past to clean tarnish. It's really easy actually and produces great results. You line a pan or in my case the sink, in aluminum tin foil and boil water. Submerge the piece in the boiling water with baking soda and a bit of salt, let sit and then the foil draws the tarnish off the piece and you're left with an item that is easier to clean. Taking apart the chandelier was a job too since it has over 800+ pieces that needed to be cleaned in this 4 step process.

Each of these 4 decorative "chains" has 50+ pieces alone.


After working on the first few pieces I used a strong bristle brush to try to remove the grime, but I wasn't getting very far. I had to go one step further and get soft brass bristle brushes to scrub the tarnish off. I normally would never use a brass bristle brush on silver but this project had to take it to a whole new level. Painstakingly I scrubbed each piece to get it as clean as I could to reveal the silver below then carefully washed it, dried it and set up a table to put all the pieces together and out of sunlight. I started this process in early June. In between work and being home occasionally I would work on polishing a few pieces as I could but couldn't dedicate to it full time. I would say I finished the first cleaning of all the pieces in mid August.

What a difference they look! After the first polishing it was time to take on the second step. Same as the first step but now with most of the grime removed I was going in to get anything I had missed . Rather than use a brass bristle had brush on this step, I purchased brass bristle polishing disc for my Dremel to reach all the tiny parts I couldn't get with the hand brush. I had to be very careful to not polish past the silver, just enough to get the grime out. After doing the second polishing it was time to use silver polish cream. I spoke to a few friends who recommended Wright's polishing cream as it was effective and they said it lasted for some time.

After the silver cream and cleaning I used soft buffing disks on my Dremel to get the silver looking really nice and wore cotton gloves to not get the oils on my hands to tarnish it. This was again a huge chore and I had been at it for months as it was now September. I kept saying to myself why was I doing this, this feels like hell and a few other words I shouldn't put here. I was so close now I could not stop. It was a challenge I had to beat. After everything was polished it was time to decide between lacquer on the piece or wax. The chandelier guys said they lacquer their chandeliers but I was hesitant to do this as lacquer would yellow over time and to strip the lacquer was quite a process. I looked into other ideas and found an interesting wax.

Renaissance wax has been around for a long time and many museums use it on their silver, wood and a whole slew of other items. It protects the finish and is very easy to remove. I decided on this to seal the chandelier being a more cautious person myself. I carefully applied the wax to all the tiny pieces of this great beast and then again buffed it to shine. After nearly 6 months of work the piece was done and it was time to bring it into the lighting shop to get it wired.


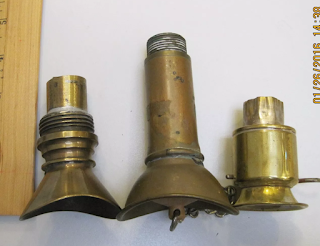
I currently have the fixture in the shop being wired. To be honest I haven't seen it all put together, only in pieces so I can't wait to see it all put together. With the chandelier having 8 gas arms I wanted to get it looking really original. I wanted to find some early glass bobeches and gas candle sleeves. I'm not a huge fan in general of the paper sleeves that cover the electric socket on light fixtures. Being someone who is difficult and detailed I searched and searched to find 8 matching bobeches and gas candle sleeves. Nearly impossible, but I found them searching high and low and sending out questions all over the world. Here are the bobeches made of custard glass. Can't wait to see these and the matching glass sleeves on the light fixture.

I have been searching for years (yes YEARS) to find a chandelier that I would not only like for above the open stairway, but also something that gave a grand impression and was scaled to fit a 2 story open stairway. One day I cam across something I though would work. The seller was asking more than I wanted to spend so I made a ridiculously small offer on it and he accepted. It was an interesting chandelier I was told was made by the Thomas Day and Company based out of San Francisco in 1893. The seller informed me that it had come out of an old mansion in San Francisco and that he had had in in storage for nearly 35 years. From the photos the seller was providing I liked the look and thought it was interesting. It appeared brass to me and was a gas and electric fixture. I was apprehensive about having it with electric sockets because all the other light fixtures I have bought for the house were strictly originally gas. Looking at the photos and the arms of the electric they matched so if it was not original to the fixture, it was a very early addition. I still think it might be original but someone might be able to tell me otherwise. I did contact the company that purchased the Day company, but they sadly did not have a catalogue from the year of the chandelier and limited catalogues from other years. Looking at what they did have, the chandelier was similar to what the company was making at the time.


As you can see this chandelier has potential, but it had seen better days. When I got it home I took it into the lighting store to discuss getting the brass cleaned up a little and getting it wired. I knew that I wouldn't be able to get the brass all polished up because it would cost a fortune. I figured they would clean it up and bit and wire it and I would hang this beauty up. When I was speaking to the store owner they informed me the chandelier was actually silver. Yes silver plate! It was impossible to tell but there were a few spots that had showed a little silver color. The shop recommended to get it replated or see what it would cost to get cleaned. It would cost at least $1,000 they estimated but said it would be worth it as it was a good and unusual chandelier. Going home with my box of pieces of a great light fixture I was sold on the idea of getting the chandelier all polished up but $1000+ seemed a bit pricy. So I decided I would roll up my sleeves and spend eternity polishing the chandelier myself and see what I could accomplish. I decided on a 4 step process. Twice I would use the hot water and baking soda method, third I would use actual silver polish and the last step would be to see what I could do about keeping the tarnish away, whether it was lacquer or waxing.
The first step would be to get all the black grime off. I couldn't just use traditional polish and take it off. The finish was gritty and black and was really on there so I used a method I have used quite a bit in the past to clean tarnish. It's really easy actually and produces great results. You line a pan or in my case the sink, in aluminum tin foil and boil water. Submerge the piece in the boiling water with baking soda and a bit of salt, let sit and then the foil draws the tarnish off the piece and you're left with an item that is easier to clean. Taking apart the chandelier was a job too since it has over 800+ pieces that needed to be cleaned in this 4 step process.

Each of these 4 decorative "chains" has 50+ pieces alone.


After working on the first few pieces I used a strong bristle brush to try to remove the grime, but I wasn't getting very far. I had to go one step further and get soft brass bristle brushes to scrub the tarnish off. I normally would never use a brass bristle brush on silver but this project had to take it to a whole new level. Painstakingly I scrubbed each piece to get it as clean as I could to reveal the silver below then carefully washed it, dried it and set up a table to put all the pieces together and out of sunlight. I started this process in early June. In between work and being home occasionally I would work on polishing a few pieces as I could but couldn't dedicate to it full time. I would say I finished the first cleaning of all the pieces in mid August.

What a difference they look! After the first polishing it was time to take on the second step. Same as the first step but now with most of the grime removed I was going in to get anything I had missed . Rather than use a brass bristle had brush on this step, I purchased brass bristle polishing disc for my Dremel to reach all the tiny parts I couldn't get with the hand brush. I had to be very careful to not polish past the silver, just enough to get the grime out. After doing the second polishing it was time to use silver polish cream. I spoke to a few friends who recommended Wright's polishing cream as it was effective and they said it lasted for some time.

After the silver cream and cleaning I used soft buffing disks on my Dremel to get the silver looking really nice and wore cotton gloves to not get the oils on my hands to tarnish it. This was again a huge chore and I had been at it for months as it was now September. I kept saying to myself why was I doing this, this feels like hell and a few other words I shouldn't put here. I was so close now I could not stop. It was a challenge I had to beat. After everything was polished it was time to decide between lacquer on the piece or wax. The chandelier guys said they lacquer their chandeliers but I was hesitant to do this as lacquer would yellow over time and to strip the lacquer was quite a process. I looked into other ideas and found an interesting wax.

Renaissance wax has been around for a long time and many museums use it on their silver, wood and a whole slew of other items. It protects the finish and is very easy to remove. I decided on this to seal the chandelier being a more cautious person myself. I carefully applied the wax to all the tiny pieces of this great beast and then again buffed it to shine. After nearly 6 months of work the piece was done and it was time to bring it into the lighting shop to get it wired.


I currently have the fixture in the shop being wired. To be honest I haven't seen it all put together, only in pieces so I can't wait to see it all put together. With the chandelier having 8 gas arms I wanted to get it looking really original. I wanted to find some early glass bobeches and gas candle sleeves. I'm not a huge fan in general of the paper sleeves that cover the electric socket on light fixtures. Being someone who is difficult and detailed I searched and searched to find 8 matching bobeches and gas candle sleeves. Nearly impossible, but I found them searching high and low and sending out questions all over the world. Here are the bobeches made of custard glass. Can't wait to see these and the matching glass sleeves on the light fixture.

So while the chandelier is being worked on I must prepare to install it and get onto the next step. Happy to be back to work and happy to be sharing it with all of you. Speak soon!

Well, I am insane with jealousy! What a knock-out! Wow. WOW!
ReplyDeleteMy 1894 house originally had gas/electric fixtures. Long gone. BIG sigh.
I know it is too late to suggest this, but I would love to see your chandelier restored to its original LOOK (but not gas FUNCTION). By this I mean going back to the original style fitters (rather than bobeches) and the original style large gas shades.
The electric shades above would be smaller versions.
Sorta like this:
http://www.houzz.com/photos/15094692/St-George-Gas-Electric-Chandelier-traditional-chandeliers-portland
However, your plan will result in a breathtaking chandelier! Congrats on your great find, and all your hard hard hard work!!!!!!!!!!
So glad you like the chandelier Ross. I first thought the lower gas arms would have had gas shades and fitters too, but it turns out they never had shades. The arms are too close together for shades and doing research this chandelier would have originally had glass bobeches and sleeves. So this is what will be wired m for the electric shades I have found speaking to the lighting shop that it had somewhat unusual. If you look really close on the electric bobeches it has 3 little hooks that had chains that hooked to the light globes. The globes were probably the stalactite shaped shades, which would also fill the space. You'll see how it fits when I put it all together. Unfortunately I now need to find 4 glass opalescent or custard glass stalactite shades.
ReplyDeleteMatt, your reply made me smile!
ReplyDeleteWhile reading the post I kept thinking: It is so NOT like Matt to Do It Right.
So, I beg for forgiveness at being a ding-dong!
I cannot wait for the restored chandelier to be hung. I have never seen such a fixture without the glass shades, and look forward to the wonder of your unique chandelier!
It is great fun learning something new. Thanks so much!
Oh, and welcome back! It is a thrill viewing your latest adventure!
ReplyDeleteYour patience is extraordinary! Almost as exceptional as my own patience while I was waiting to see a new post from you. ;) All joking aside, grad to read you again.
ReplyDeleteHaha thank you Eric. I do love sharing my projects. Just wish I was more disciplined in writing posts. Hopefully I'll be a bit more active in my writings now that I am home for some time. :)
DeleteMatt-
ReplyDeleteI have been looking for a twisted glass gas candle - pink satin glass-to replace a broken one on an old fixture. Do you have any resources I might check? Ebay has nothing & I have also looked everywhere.
Thanks
Mark
Hello Mark. They do come up on Ebay I would say every now and then. I assume you have checked you antique lighting stores. If you want to send me a photo I could check some of my local sources in Minneapolis/ St. Paul. My email address is Victoriansalvage at gmail.
DeleteI've recently stumbled over your blog, and DUDE. The chandelier made me sign in and comment. It's lovely! Exciting! and a true testament to your patience and hard work. Sweat equity is amazing and I'm so delighted on your behalf.
ReplyDeleteAs an aside...your vestibule and little closet under the stairs are delightful and lovely and, again, a true testament to hard work. I'm incredibly impressed.
Hi Jessica. Thanks so much for your comments. Some days I feel like I write this blog and nobody pays much attention to it, but a handful of people. When someone takes the time to leave a comment or share their thoughts it really brightens up my day, so thank you.
DeleteSo glad you are enjoying the projects and the house. I guess I'm in this deep no so I can't really give up. While I love all the wood and how the little closet looks I will admit that with it being only 5 feet tall, my head doesn't always appreciate it so much. Too many times have I banged my head ( being 6'3 myself) even though I duck. The quirks of having an old house! :)